Shift lever — removal and installation Ford F150
Note: The Transmission Control Switch (TCS) contains the tow/haul switch and upshift/ downshift (SelectShift) buttons. Both are part of the shift lever/shift knob, and not serviceable separately.
Shift knob — console mounter shifter
1. Set the parking brake.
2. Open the center console lid and pull firmly to release the clips attaching the trim panel around the shifter and cup holder, to the center console.
3. Remove the screws in the console center tray and pull firmly to release the clips attaching the shifter bezel to the center console.
4. Raise the shifter bezel enough to disconnect the electrical connectors and detach the shift boot clips. Remove the shifter bezel.
5. Turn the ignition on, press the brake pedal and move the shifter to the 1 position.
6. Disconnect the shift knob electrical connector.
7. Remove the screws attaching the shift knob to the shift lever assembly and remove the knob and boot.
8. The boot can be removed from the knob.
9. Installation is the reverse of removal.
Shift lever — column mounted shifter
10. Remove the steering column covers (see Body).
Disconnect the TCS connector
11. Unplug the electrical connector for the shift lever.
Remove the shift lever bolt
12. Remove the shift lever bolt.
13. Remove the shift lever.
14. Installation is the reverse of removal. Be sure to replace the shift lever bolt; do NOT use the old bolt.
Shift lever assembly Column mounted shifter
Caution: Before replacing the column shift lever assembly for no-start or hard-to-shift concern, verify the shift cable-to-bracket clips are seated fully at both the transmission and the shift lever assemblies. Cables that are not fully seated can be the cause of shift cable binding and may prevent the manual shaft from fully returning to the P position, causing a no-start condition.
15. Set the parking brake.
16. Move the shift lever to the Neutral (N) position.
17. Remove the shift lever.
18. Disconnect the BTSI solenoid connector
Disconnect the BTSI solenoid connector (A) and the shift cable (B)
19. Using a screwdriver, carefully pry the shift cable from the shift lever pivot.
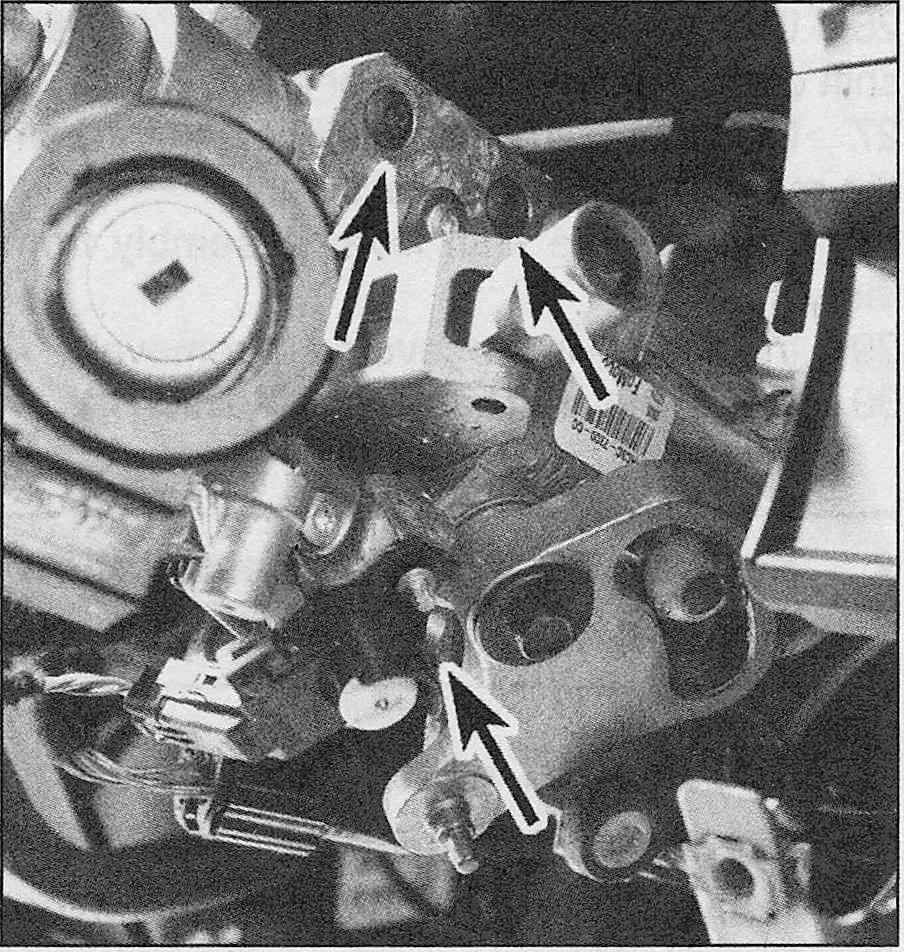
Remove the three screws to remove the shift lever mechanism
20. Remove and discard the three screws attaching the shift lever assembly to the steering column.
21. Installation is the reverse of removal.
22. Use new bolts when installing the shift lever assembly to the column.
Console mounted shifter
Note: The BTSI solenoid is part of the shift lever assembly and not serviceable separately.
23. Remove the shift knob.
24. Remove the four bolts attaching the shift lever assembly to the floor.
25. Remove the bolt attaching the shift cable to the shift lever assembly.
26. Using a screwdriver, carefully pry the shift cable from the shift lever pivot.
27. Disconnect the electrical connector from the rear of the shift lever assembly.
28. Remove the shift lever assembly from the vehicle.
29. Installation is the reverse of removal.
30. Adjust the shift cable (see Shift cable – removal, installation and adjustment).


