Tailgate latch, release handle, actuator and lock cylinder removal and installation Ford F150
1. Lower the tailgate and remove the tailgate access cover (see illustration).
.1 Remove the cover screws to access the inside of the tailgate
Latch
Note: The top (outermost) latch fastener will need to be replaced upon installation.
2. Remove the latch mounting fasteners (see illustration). It may be necessary to use an impact-driver to loosen them.
.2 Remove the tailgate latch mounting fasteners
3. Disconnect the control rod from the latch control assembly (for the side being replaced) (see illustration), then remove the latch with the rod from the tailgate.
.3 Unclip the necessary latch rod out of the retaining clip on the latch control assembly
1. Right side latch rod
2. Left side latch rod
4. If replacing the latch, transfer the control rod onto the new latch, securing it with the retaining clip.
5. Installation is the reverse of removal.
Install a new top (outer) latch bolt.
Release handle
6. Remove the tailgate access cover (see illustration .1).
7. Remove the release handle mounting nuts (see illustration).
.7 Release handle nut location — 1 of 2 shown
8. Remove the handle from the tailgate body, positioning it outward for better access to the inner handle components.
9. On mechanical handle models, disconnect the control rods (see illustration) and rear view camera electrical connector, if equipped.
.9 Disconnect the handle lock cylinder rod (shown) and release rod (not shown, but similar)
10. On models without mechanical handles, disconnect the various electrical connectors to the handle.
11. Remove the handle from the tailgate.
12. Transfer the necessary inner handle components to the new handle.
13. Installation is the reverse of removal.
Latch control actuator assembly
14. Remove the tailgate access cover screws and cover (see illustration .1).
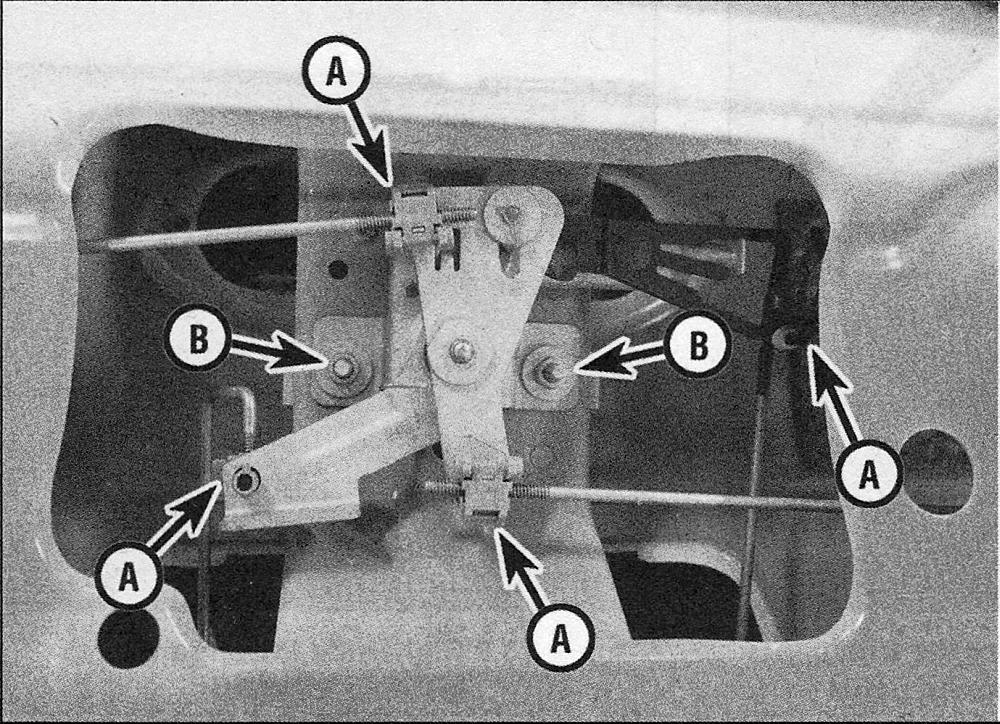
15. Disconnect the control rods and remove the assembly retaining nuts (see illustration).
.15 Disengage the control actuator-tolatch and lock rods (A) and remove the control actuator retaining nuts (B)
16. Disconnect the electrical connector(s) to the actuator, if equipped, then remove the assembly from the tailgate.
17. Installation is the reverse of removal.
Automatic actuator (if equipped)
18. Remove the latch control actuator assembly (see Steps 14 through 16).
19. Remove the auto actuator-to-control assembly fasteners and separate the actuator from the control assembly.
20. Installation is the reverse of removal.
Lock cylinder
21. Remove the release handle (see Steps 6 through 11).
22. Remove the lock cylinder retaining nut then slide out the lock from the tailgate handle.
23. Installation is the reverse of removal.


