Roller followers and valve lash adjusters — removal, inspection and installation Ford F150
Caution: These engines are difficult to work on and require special tools for many procedures. On any procedure involving timing chain, camshaft or cylinder head removal, the steps must be read carefully and disassembly must proceed using the special tools, otherwise damage to the engine could result.
Removal
1. Remove the valve cover(s) (see Valve covers – removal and installation).
2. Remove the camshaft that operates the roller followers being serviced (see Camshaft(s) – removal, inspection and installation).
3. Separate the hydraulic lash adjusters from the clips that secure them to the roller followers.
Note: Store the parts so that each lash adjuster is with its original roller follower.
Inspection
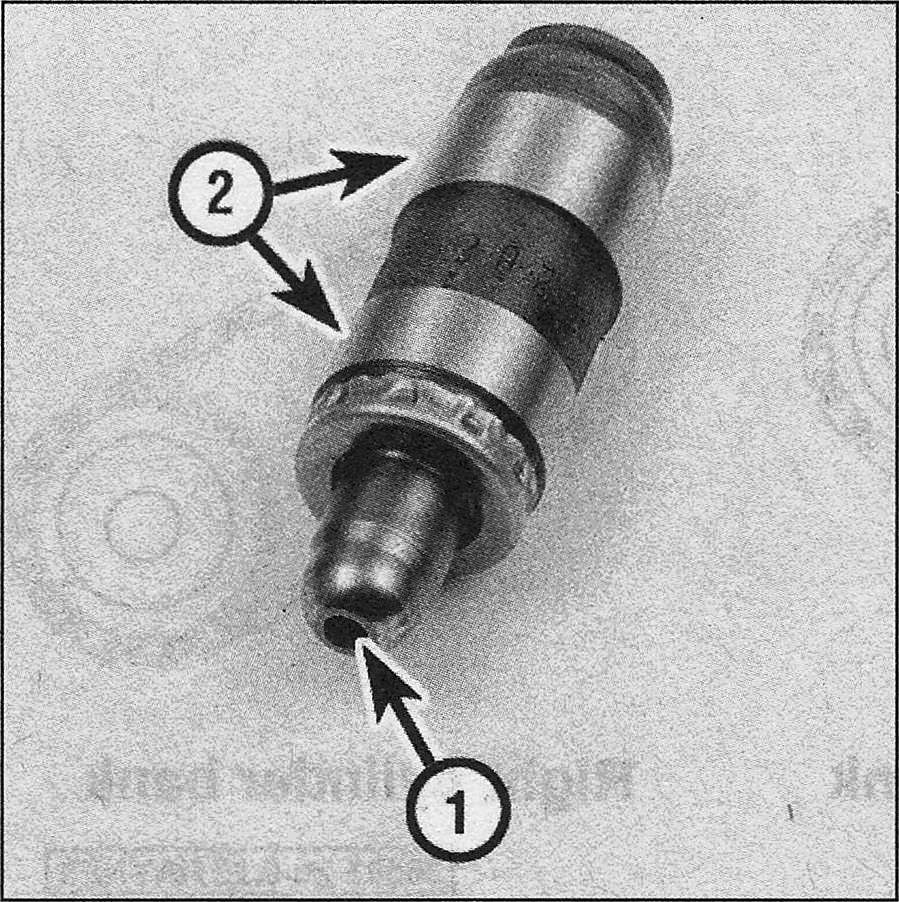
i.4 Inspect the lash adjuster for signs of excessive wear or damage, such as pitting, scoring or signs of overheating (bluing or discoloration), where the tip contacts the camshaft follower (1) and the side surfaces that contact the lifter bore in the cylinder head (2)
4. Inspect each adjuster carefully for signs of wear or damage. The areas of possible wear are the ball tip that contacts the roller follower and the sides of the adjuster that contact the bore in the cylinder head (see illustration). Since the lash adjusters can become clogged as mileage increases, we recommend replacing them if you’re concerned about their condition or if the engine is exhibiting valve tapping noises.
5. A thin wire or paper clip can be placed in the oil hole to move the plunger and make sure it’s not stuck. It’s recommended that if replacement of any of the adjusters is necessary, that the entire set be replaced. This will avoid the need to repeat the repair procedure as the others require replacement in the future.
i.6 Check the roller surface of the rocker arms and the areas where the valve stem and lash adjuster contact the rocker
Note: The lash adjuster must have no more than 1/16-inch of total plunger travel.
6. Inspect the roller lifters for signs of wear or damage. The areas of wear are the ball socket that contacts the lash adjuster and the roller where the follower contacts the camshaft (see illustration).
Installation
Note: When re-starting the engine after replacing the adjusters, the adjusters will normally make some tapping noises, until all the air is bled from them. After the engine is warmed-up, raise the speed from idle to 3,000 rpm for one minute. Stop the engine and let it cool down. All of the noise should be gone when it is restarted.
7. Before installing the lash adjusters, bleed as much air as possible out of them. Stand the adjusters upright in a container of oil. Use a thin wire or paper clip to work the plunger up and down. This primes the adjuster and removes most of the air. Leave the adjusters in the oil until ready to install (just be sure not to mix them up).
8. Lubricate the valve stem tip, rocker arm, and lash adjuster bore with clean engine oil.
9. Install the lash adjusters and roller followers.
10. Install the camshaft(s) for the lifter(s) being serviced (see Camshaft(s) – removal, inspection and installation).
11. The remainder of installation is the reverse of removal.

